


This post originally appeared last year, but I thought it was time to bring it back to the "top of the blog".
I'm honored to bring Rich Sterling to you this week as a guest poster on the BBQ Blog (Part 1 or a 3 Part series). If you've ever thought about, wondered about, or plan to build a brick bbq pit in the future, take note.
Thanks to Rich Sterling for sharing his experience with the BBQ Blog readers.
2/17/2006--Here in Upstate NY, near Albany, we really don't have anything available to us to just stop by and just EAT! About the closest to real BBQ in my area was a local place called "Tex's BBQ" in Albany, NY which is now out of business. Then we have Dinosaur BBQ in Syracuse and NYC. We have a few local caterers that do the local benefit functions, etc. if you don't mind paying about $9.00 for a quarter chicken cooked over charcoal. That just wasn't cutting it for me so I decided to build my own pit.
With spring just around the corner, now is the time I started my research last year (2005) on "How to build a brick BBQ". I knew what I wanted but never working with bricks and mortar before in my life, I was a little nervous going into this project. I'm a computer support technician by day and an avid woodworking hobbyist. In addition to the taste of genuine slow cooked BBQ, I have always enjoyed the pleasant aroma of various woods used during an all day cookout or even a campfire. Just the same, there's nothing like the smell of fresh cut cherry in my shop when I'm working on a woodworking project. I knew I wanted to build something that would be functional as a BBQ/Smoker pit, be an asthetically pleasing focal point in my yard, AND relatively inexpensive. Basically it would have to please me AND my wife.
The following will be a series of articles on Research and Planning, Design and Design-as-you-go construction, and the best part - Using the Pit.
RESEARCH AND PLANNING
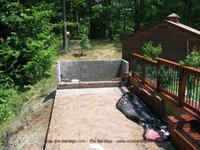
I surfed and surfed and came up with a few good ideas from the Internet. Another decent source of information was a paperback book called Building Barbecues & Outdoor Kitchens by Sunset books. Once I got the basic shape in mind I had to determine the overall space I had to work with. Of course, in my particular situation I had just got a stamped concrete patio poured so I knew exactly what I had to work with. (10 feet).
You must also take into consideration, your surroundings. Going with a design that includes a fireplace as mine does, it does generate some heat. You really don't want it directly under any low trees! You'll need a chimney cover to keep sparks to a minimum and to keep precipitation from entering down your flue. You should also leave plenty of space around the entire perimeter, with of course plenty of space in the front for lounging.
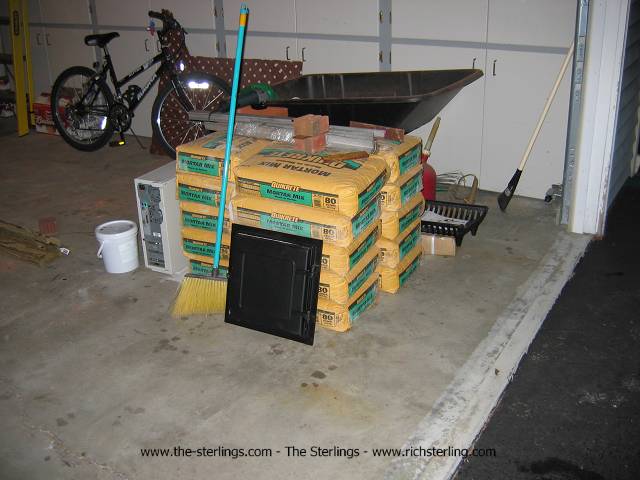
Since mine is on my poured patio I'm confident it can handle the weight. Concrete is cheap, go thick enough! Maybe even go wide enough to include a nice hearth area or an area for sitting, but I recommend at least a couple of feet for sparks, etc. The weight of the truck that dropped off my materials was enough to crush my driveway, no water added. Each one of those yellow bags of mortar you see in the photos are 80 pounds each. You cringe each time you have to open a new bag.
Along with the research I had to do on my initial design, I had NO experience whatsoever in masonry. If you're in the same arena as me, you might want to do a smaller practice project somewhere in your yard BEFORE mixing your first batch of mortar and going to town. If I had to do it all over again, I would have definately practiced first! Although I learned a lot by trial and error, sometimes the knowledge gained was a little too late. It made for a lot of scrubbing and cleaning in the long run
and a lot of mis-aligned or loose brick and block right from the start.
Since this IS a masonry project, I highly recommend consulting with a TRUE Mason BEFORE starting the job. I found that getting several opinions and suggestions from "ALMOST" Masons resulted in too many varying opinions and when it came down to it, in 90 degree heat, neither bickering over which way was best OR undoing/redoing work was NOT what I enjoyed the most about this project, especially with all the pre-planning I thought I had done.
There are several good websites out there which offer great advice for the novice. In addition to your research on barbeques another good resource for methods and ideas are brick pizza and bread ovens. My original design had a small brick oven that was going on the left side. Due to space limitations and time constraints, I had to nix it in the end. Now I really wish I inlcuded it. Time is also another factor you really need to have planned out from the very beginning.
So, you have an idea in mind where do you go from there? Get some graph paper and start with a basic sketch. Next, since I'm an avid computer geek as well I open the Paintbrush program that most everyone has already on their computers and I started pulling in basic images of ideas I liked. I actually saved these files too but have since lost them because I wasn't a [i]good enough[/i] computer geek! (Long story, but Earthlink is no longer my friend!) So now I have a rough draft of what I wanted it to look like and how I wanted it to function. I was ready to start ordering materials...but how many and how much?
Some of the articles on the Internet had actually included the quantity of bricks, blocks and mortar others have used in their projects. This was very helpful and gave a good starting point. Then once I had a rough idea in mind of the quantities I thought I needed, I went to my local brick supplier. The salesman also had a way to calculate the quantity of mortar I would need based on the amount of bricks I was purchasing.
I started with (20) 80 pound bags and purchased an additional (8) bags by the time the job was complete. The other thing I had done to calculate the total number of materials was to simply count the number of bricks in a certain amount of rows, etc. and then multiply by the number of rows I thought I had to go to obtain my total height. Even with all the pre-planning I had done, I ended up making several trips to the brickyard with my own truck for additional brick and block. I beleive the total count of red "backer brick" I used was 1,000. I also used 4x8x16 hollow block for the back and sides which saved me a little. The red backer brick were .42 cents each and the block were .72 cents each. Bags of mortar were somewhere around $7.50 each.
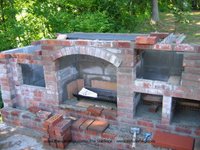
The most difficult part to plan ahead of time was the ceiling. Again, I knew what I wanted to do but I couldn't find any detailed examples to give me an idea ahead of time on how to construct it and tie it in all together. I knew the fundamentals of how to build the ceiling so I went to my local metal scrap yard and I was able to pick up various lengths of extruded aluminum 5/16" thick angle stock. Since it was a friend that owned the scrap yard I couldn't really be choosy about the donation :)
I stopped to my local steel mill who has a scrap pile you can pick through for .50 cents a pound. There, I was to pick up some flat iron stock and some longer angle iron. These are the pieces I used across the top lenghtwise to hold up my chimney flue and my ceiling of firebrick on the inside.
Once I ordered all of my materials from the brickyard, the truck showed up a couple days later and it was all at the top of my driveway waiting for me when I got home, on a Friday no less. I thought I was golden having the whole weekend ahead of me. I had my basic idea all laid out in Microsoft Paintbrush by now, so with printed copy in hand I started dry-stacking everything. I had everything all dry stacked in 2 hours flat. Piece of cake, now all I need to do is mix up some mortar tomorrow and "glue it all together".
Yeah, right. This whole thing took me from May to July!
CONSTRUCTION: Article coming soon. Stay tuned or check out the rest of the photos at http://www.richsterling.com/ !
USE: Article also coming soon... detailed pics as the weather warms up of our spring and summer entertaining.
2/17/2006--Here in Upstate NY, near Albany, we really don't have anything available to us to just stop by and just EAT! About the closest to real BBQ in my area was a local place called "Tex's BBQ" in Albany, NY which is now out of business. Then we have Dinosaur BBQ in Syracuse and NYC. We have a few local caterers that do the local benefit functions, etc. if you don't mind paying about $9.00 for a quarter chicken cooked over charcoal. That just wasn't cutting it for me so I decided to build my own pit.
With spring just around the corner, now is the time I started my research last year (2005) on "How to build a brick BBQ". I knew what I wanted but never working with bricks and mortar before in my life, I was a little nervous going into this project. I'm a computer support technician by day and an avid woodworking hobbyist. In addition to the taste of genuine slow cooked BBQ, I have always enjoyed the pleasant aroma of various woods used during an all day cookout or even a campfire. Just the same, there's nothing like the smell of fresh cut cherry in my shop when I'm working on a woodworking project. I knew I wanted to build something that would be functional as a BBQ/Smoker pit, be an asthetically pleasing focal point in my yard, AND relatively inexpensive. Basically it would have to please me AND my wife.
The following will be a series of articles on Research and Planning, Design and Design-as-you-go construction, and the best part - Using the Pit.
RESEARCH AND PLANNING
I surfed and surfed and came up with a few good ideas from the Internet. Another decent source of information was a paperback book called Building Barbecues & Outdoor Kitchens by Sunset books. Once I got the basic shape in mind I had to determine the overall space I had to work with. Of course, in my particular situation I had just got a stamped concrete patio poured so I knew exactly what I had to work with. (10 feet).
You must also take into consideration, your surroundings. Going with a design that includes a fireplace as mine does, it does generate some heat. You really don't want it directly under any low trees! You'll need a chimney cover to keep sparks to a minimum and to keep precipitation from entering down your flue. You should also leave plenty of space around the entire perimeter, with of course plenty of space in the front for lounging.
Since mine is on my poured patio I'm confident it can handle the weight. Concrete is cheap, go thick enough! Maybe even go wide enough to include a nice hearth area or an area for sitting, but I recommend at least a couple of feet for sparks, etc. The weight of the truck that dropped off my materials was enough to crush my driveway, no water added. Each one of those yellow bags of mortar you see in the photos are 80 pounds each. You cringe each time you have to open a new bag.
Along with the research I had to do on my initial design, I had NO experience whatsoever in masonry. If you're in the same arena as me, you might want to do a smaller practice project somewhere in your yard BEFORE mixing your first batch of mortar and going to town. If I had to do it all over again, I would have definately practiced first! Although I learned a lot by trial and error, sometimes the knowledge gained was a little too late. It made for a lot of scrubbing and cleaning in the long run
and a lot of mis-aligned or loose brick and block right from the start.
Since this IS a masonry project, I highly recommend consulting with a TRUE Mason BEFORE starting the job. I found that getting several opinions and suggestions from "ALMOST" Masons resulted in too many varying opinions and when it came down to it, in 90 degree heat, neither bickering over which way was best OR undoing/redoing work was NOT what I enjoyed the most about this project, especially with all the pre-planning I thought I had done.
There are several good websites out there which offer great advice for the novice. In addition to your research on barbeques another good resource for methods and ideas are brick pizza and bread ovens. My original design had a small brick oven that was going on the left side. Due to space limitations and time constraints, I had to nix it in the end. Now I really wish I inlcuded it. Time is also another factor you really need to have planned out from the very beginning.
So, you have an idea in mind where do you go from there? Get some graph paper and start with a basic sketch. Next, since I'm an avid computer geek as well I open the Paintbrush program that most everyone has already on their computers and I started pulling in basic images of ideas I liked. I actually saved these files too but have since lost them because I wasn't a [i]good enough[/i] computer geek! (Long story, but Earthlink is no longer my friend!) So now I have a rough draft of what I wanted it to look like and how I wanted it to function. I was ready to start ordering materials...but how many and how much?
Some of the articles on the Internet had actually included the quantity of bricks, blocks and mortar others have used in their projects. This was very helpful and gave a good starting point. Then once I had a rough idea in mind of the quantities I thought I needed, I went to my local brick supplier. The salesman also had a way to calculate the quantity of mortar I would need based on the amount of bricks I was purchasing.
I started with (20) 80 pound bags and purchased an additional (8) bags by the time the job was complete. The other thing I had done to calculate the total number of materials was to simply count the number of bricks in a certain amount of rows, etc. and then multiply by the number of rows I thought I had to go to obtain my total height. Even with all the pre-planning I had done, I ended up making several trips to the brickyard with my own truck for additional brick and block. I beleive the total count of red "backer brick" I used was 1,000. I also used 4x8x16 hollow block for the back and sides which saved me a little. The red backer brick were .42 cents each and the block were .72 cents each. Bags of mortar were somewhere around $7.50 each.
The most difficult part to plan ahead of time was the ceiling. Again, I knew what I wanted to do but I couldn't find any detailed examples to give me an idea ahead of time on how to construct it and tie it in all together. I knew the fundamentals of how to build the ceiling so I went to my local metal scrap yard and I was able to pick up various lengths of extruded aluminum 5/16" thick angle stock. Since it was a friend that owned the scrap yard I couldn't really be choosy about the donation :)
I stopped to my local steel mill who has a scrap pile you can pick through for .50 cents a pound. There, I was to pick up some flat iron stock and some longer angle iron. These are the pieces I used across the top lenghtwise to hold up my chimney flue and my ceiling of firebrick on the inside.
Once I ordered all of my materials from the brickyard, the truck showed up a couple days later and it was all at the top of my driveway waiting for me when I got home, on a Friday no less. I thought I was golden having the whole weekend ahead of me. I had my basic idea all laid out in Microsoft Paintbrush by now, so with printed copy in hand I started dry-stacking everything. I had everything all dry stacked in 2 hours flat. Piece of cake, now all I need to do is mix up some mortar tomorrow and "glue it all together".
Yeah, right. This whole thing took me from May to July!
CONSTRUCTION: Article coming soon. Stay tuned or check out the rest of the photos at http://www.richsterling.com/ !
USE: Article also coming soon... detailed pics as the weather warms up of our spring and summer entertaining.
PS: You really will love the BBQ Pizza! It's the best :)
Brick BBQ Pit
***
Want to learn how to make money online?
Click here
7 comments:
Wow, good timing for me: 200 miles down the Thruway from you in Darien, NY we're planning on building a memorial BBQ. How'd things go? Like you, we have pretty much unlimited use of a scrapyard. We also have a friend who is a bricklayer. Space is not an object - I get the feeling I want to add a bread/pizza oven now. We're just drawing up plans now, any suggestions overall or specific?
Great tips. Thanks for sharing.
Wow looks amazing! I'm going to give on a try too, just doing some research!
WOW! Those are awsome pits but the burgers look for better to me. Yummy!
I am planning to build my first barbecue (in fact, first anything!). I just lost my 3rd barbecue to rust so decided time for a brick one.
I have got some reclaimed bricks that are covered in cement. It seems to come off easyish. Do you think these are OK to use? I am only planning a simple one.
Jon,
I'm not too sure about the reclaimed bricks. Perhaps someone with more experience building brick barbecues will be able to answer.
This looks like a great brick bbq, do you know where I can find detailed plans and more pics? I tried clicking on the richsterling.com link but it requires a password.
thanks!
Post a Comment