I just finished vacuum sealing the brisket I cooked today. It will keep just fine in the freezer until I'm ready to serve it.
For storing bbq more than a day or two, I think a vacuum sealer is one of those "must have" tools of the trade. The vacuum sealer will keep things fresh and storage is a breeze.
When it's time to serve the 'que, I'll thaw it and reheat it in the microwave or in a crock pot.
Sunday, January 27, 2008


Monday, January 21, 2008
Jack's Old South Cooking School
I'm not able to make it to the next scheduled Jack's Old South Cooking School on Feb 29th, but in case you're interested here's some more information about the agenda and schedule for the school.
The school will start out with a dinner at Myron Mixon's home in Unadilla, GA on Feb. 28th. Saturday, March 1st, Myron will begin with whole hog and then move into brisket, chicken, ribs, and pork shoulder (butts). Myron will cover every aspect of the cooking process from sauces, rubs, injections, and meat prep along with tips on the final presentation of bbq product for the judges. The class will conclude Sunday, March 2nd around 3:30 p.m.
A three-time world champion, Myron has the bbq credentials that most bbq competitors aspire to achieve.
The school will start out with a dinner at Myron Mixon's home in Unadilla, GA on Feb. 28th. Saturday, March 1st, Myron will begin with whole hog and then move into brisket, chicken, ribs, and pork shoulder (butts). Myron will cover every aspect of the cooking process from sauces, rubs, injections, and meat prep along with tips on the final presentation of bbq product for the judges. The class will conclude Sunday, March 2nd around 3:30 p.m.
A three-time world champion, Myron has the bbq credentials that most bbq competitors aspire to achieve.
Thursday, January 17, 2008
BBQ Discount Program
The Kansas City Barbeque Society (KCBS) recently announced a discount program available through participating Choice Hotels that provides a 15% discount at various Choice Hotels including Comfort Inn and Clarion.
If you are a KCBS member, you can get your own discount code via e-mail.
If you are a KCBS member, you can get your own discount code via e-mail.
BBQ Business Plan
Many of us who cook bbq in contests, for friends, or even in competition have spent some time thinking about the in's and out's involved in starting a bbq restaurant.
There are books about starting businesses available for free at the local library and many other good ones for sale at the local book store, or you can order them from Amazon. Sooner or later though, you're going to need some detailed information regarding the profit potential, start-up costs, and working capital requirements for various formats of a bbq restaurant.
You can get the specifics from someone else who already operates the style of restaurant you're considering, if they are willing to assist. You can search around on the internet for restaurant statistics via small business websites, but perhaps one of the more relevant sources of information is to purchase an actual business plan that was used to open a bbq restaurant.
I haven't read this business plan and cannot vouch for it's contents, but based on the outline it looks like it just might fit the bill. For anyone thinking of spending $200,000-$300,000 to start a restaurant, $25 seems like a wise investment.
***
Want to learn how to make money online?
Click here
There are books about starting businesses available for free at the local library and many other good ones for sale at the local book store, or you can order them from Amazon. Sooner or later though, you're going to need some detailed information regarding the profit potential, start-up costs, and working capital requirements for various formats of a bbq restaurant.
You can get the specifics from someone else who already operates the style of restaurant you're considering, if they are willing to assist. You can search around on the internet for restaurant statistics via small business websites, but perhaps one of the more relevant sources of information is to purchase an actual business plan that was used to open a bbq restaurant.
I haven't read this business plan and cannot vouch for it's contents, but based on the outline it looks like it just might fit the bill. For anyone thinking of spending $200,000-$300,000 to start a restaurant, $25 seems like a wise investment.
***
Want to learn how to make money online?
Click here
Sunday, January 13, 2008
BBQ Triple Crown
The Florida BBQ Association is sanctioning the FBA Triple Crown in 2008. The triple crown includes contests known as "qualifiers". The accumulated points garnered in these events will be used to choose the top 10 teams from each group of 3 contests. The top 10 teams from each state will be invited to the FBA Triple Crown Championship to be held in December 2008.
Visit the FBA website for all the pertinent details.
The FBA recently held it's first event of 2008 in Sebring, FL. Congratulations to Bub-Ba Q and HomeBBQ.com for their first and second place finishes!
To see the entire finishing order and the team of the year standings, visit the Team of the Year page.
Visit the FBA website for all the pertinent details.
The FBA recently held it's first event of 2008 in Sebring, FL. Congratulations to Bub-Ba Q and HomeBBQ.com for their first and second place finishes!
To see the entire finishing order and the team of the year standings, visit the Team of the Year page.
Sunday, January 06, 2008
Daisy May's BBQ
BBQ in New York City anyone?
I must admit that I have my own personal doubts. I've never been to New York City, but MidtownLunch.com, a website about eating lunch in New York City, is a big fan of Daisy May's BBQ carts.
Daisy May's offers bbq pulled pork, bbq beef brisket (chopped), bbq chicken, and Texas red chili from three bbq cart locations. Daisy May's also has a permanent location.
Midtown Lunch has been featured in the New York Times and New York Post and publishes feature stories on the blog about the choices for lunch in midtown New York City.
I must admit that I have my own personal doubts. I've never been to New York City, but MidtownLunch.com, a website about eating lunch in New York City, is a big fan of Daisy May's BBQ carts.
Daisy May's offers bbq pulled pork, bbq beef brisket (chopped), bbq chicken, and Texas red chili from three bbq cart locations. Daisy May's also has a permanent location.
Midtown Lunch has been featured in the New York Times and New York Post and publishes feature stories on the blog about the choices for lunch in midtown New York City.
Wednesday, December 12, 2007
Smokey Bones Chain Sold to Sun Capital Partners
The chain of 73 restaurants operated by Darden Restaurants based in Orlando, FL has been sold to Sun Capital Partners according to this article in the Atlanta Business Chronicle.
The article goes on to explain that the new owners plan to add more beer and adult frozen drinks to the menu.
I've got a suggestion for the new owners, how about focusing on improving the quality of the barbecue?
If adding drinks to the menu would fix their ills, don't you think Darden would have figured that out already?
The article goes on to explain that the new owners plan to add more beer and adult frozen drinks to the menu.
I've got a suggestion for the new owners, how about focusing on improving the quality of the barbecue?
If adding drinks to the menu would fix their ills, don't you think Darden would have figured that out already?
Sunday, December 09, 2007
Open Hearth Cooking in Mugnaini Pizza Oven
Mugnaini manufacturers a popular wood fired pizza oven that can be used for a variety of open hearth cooking techniques. According to the manufacturer, these ovens are listed with UL and NSF.
With models ranging in size from 9 sq. ft. to 28 sq. ft. (big enough for fourteen 12" pizzas), there is an oven that's just right for your back yard, kitchen, or restaurant.
Based on my online research, you can purchase a very nice oven for the back yard that costs in the range of $3,000 plus installation costs.
With models ranging in size from 9 sq. ft. to 28 sq. ft. (big enough for fourteen 12" pizzas), there is an oven that's just right for your back yard, kitchen, or restaurant.
Based on my online research, you can purchase a very nice oven for the back yard that costs in the range of $3,000 plus installation costs.
Saturday, December 08, 2007
Pork, Brisket and Chicken Leg Quarters
 Sometimes I forget how much I like cooking barbecue in Florida, but days like this bring everything back into focus. This picture was taken Sunday at 9:30 a.m. in my front driveway.
It was a glorious day for 'queing. December in Florida is really nice.
I injected two pork butts with apple juice with some clover honey mixed into it and rubbed them up with Smokin' Guns' Mild.
I trimmed the fat cap from the 13 lb. packer brisket purchased at the local butcher shop and rubbed it down with The BBQ Guy's Southern BBQ Rub.
I applied Smokin' Guns' Mild to some leg quarters and marinaded them in some Newman's Own salad dressing for three hours before cooking.
Monday, December 03, 2007
Instant Read Pocket Thermometer

Thermopen by Thermoworks is a useful tool for serious bbq enthusiasts. The Polder and Taylor pocket thermometers will work, but they are not true "instant read" thermometers.
The Thermopen will display the temperature reading within 3 or 4 seconds. My Taylor digital thermometer takes up to 15 seconds to register a "final" reading.
The Thermopen will display the temperature reading within 3 or 4 seconds. My Taylor digital thermometer takes up to 15 seconds to register a "final" reading.
When a bbq smoker is involved, holding the door open for 15 or 20 seconds to take a temperature reading causes the cooker to cool off fast and work harder to catch up. At a bbq cook-off, this could be the difference between winning and merely a top 10 finish.
Treat your bbq cook to the best temperature instrument on the market.
Sunday, December 02, 2007
BBQ Gift Ideas
During the month or so before the holidays every year, I receive a lot of e-mails about bbq gifts. My family sends them to me, my wife asks me about them, and I receive several inquiries from visitors to this website.
This year I thought I'd put together a series of posts that provide bbq gift ideas that range in size from small to large and in price from cheap to expensive.
Let's start off with perhaps the most popular question I've received this year, "What do I get the barbecuer that already has everything?"
My response: Lodge cast iron of course.

This 4-quart Lodge cast iron dutch oven is large enough for baking, but still small enough for chili, stew, or even frying fish. The "camp oven" is my preferred style, because it allows you to put the charcoal on the lid for roasting. You can buy this oven on ebay, from Amazon, or if you live near South Pittsburg, TN -- you buy directly from the Lodge outlet store.
Accessories that will go nicely with the dutch oven include a lid lifter and lid stand. There is also a nice video by Johnny Nix that will help you barbecuer learn more about the versatility of Lodge cast iron.
If you're the type of person that likes to "see it before you buy it", Lodge products are also available at most popular outdoor stores, such as Bass Pro Shops and Cabela's.
This year I thought I'd put together a series of posts that provide bbq gift ideas that range in size from small to large and in price from cheap to expensive.
Let's start off with perhaps the most popular question I've received this year, "What do I get the barbecuer that already has everything?"
My response: Lodge cast iron of course.
This 4-quart Lodge cast iron dutch oven is large enough for baking, but still small enough for chili, stew, or even frying fish. The "camp oven" is my preferred style, because it allows you to put the charcoal on the lid for roasting. You can buy this oven on ebay, from Amazon, or if you live near South Pittsburg, TN -- you buy directly from the Lodge outlet store.
Accessories that will go nicely with the dutch oven include a lid lifter and lid stand. There is also a nice video by Johnny Nix that will help you barbecuer learn more about the versatility of Lodge cast iron.
If you're the type of person that likes to "see it before you buy it", Lodge products are also available at most popular outdoor stores, such as Bass Pro Shops and Cabela's.
Friday, November 30, 2007
BBQ Trivia Quiz Game
Do you think you know about bbq?
I have found a neat bbq game that you might want to try. It's surprisingly interesting. If you take the "quiz", come back and let us know how you did. (I scored 7 correct out of 10).
I have found a neat bbq game that you might want to try. It's surprisingly interesting. If you take the "quiz", come back and let us know how you did. (I scored 7 correct out of 10).
Thursday, November 22, 2007
BBQ Catering Worksheet
Mike Trump's bbq catering Excel worksheet has been updated. This worksheet can make you money and save you money on your next catering job. Use the worksheet to calculate the amount of meat to use, to calculate the cost per serving, figure retail cost, and ensure profitability for your next catering event.
It's also useful for family events. How many times have you cooked for family reunions and gatherings and run out of food? How many times have you blown your budget or cooked too much food? This worksheet can help solve those problems too.
It's also useful for family events. How many times have you cooked for family reunions and gatherings and run out of food? How many times have you blown your budget or cooked too much food? This worksheet can help solve those problems too.
Building a Brick BBQ Pit




This post originally appeared last year, but I thought it was time to bring it back to the "top of the blog".
I'm honored to bring Rich Sterling to you this week as a guest poster on the BBQ Blog (Part 1 or a 3 Part series). If you've ever thought about, wondered about, or plan to build a brick bbq pit in the future, take note.
Thanks to Rich Sterling for sharing his experience with the BBQ Blog readers.
2/17/2006--Here in Upstate NY, near Albany, we really don't have anything available to us to just stop by and just EAT! About the closest to real BBQ in my area was a local place called "Tex's BBQ" in Albany, NY which is now out of business. Then we have Dinosaur BBQ in Syracuse and NYC. We have a few local caterers that do the local benefit functions, etc. if you don't mind paying about $9.00 for a quarter chicken cooked over charcoal. That just wasn't cutting it for me so I decided to build my own pit.
With spring just around the corner, now is the time I started my research last year (2005) on "How to build a brick BBQ". I knew what I wanted but never working with bricks and mortar before in my life, I was a little nervous going into this project. I'm a computer support technician by day and an avid woodworking hobbyist. In addition to the taste of genuine slow cooked BBQ, I have always enjoyed the pleasant aroma of various woods used during an all day cookout or even a campfire. Just the same, there's nothing like the smell of fresh cut cherry in my shop when I'm working on a woodworking project. I knew I wanted to build something that would be functional as a BBQ/Smoker pit, be an asthetically pleasing focal point in my yard, AND relatively inexpensive. Basically it would have to please me AND my wife.
The following will be a series of articles on Research and Planning, Design and Design-as-you-go construction, and the best part - Using the Pit.
RESEARCH AND PLANNING
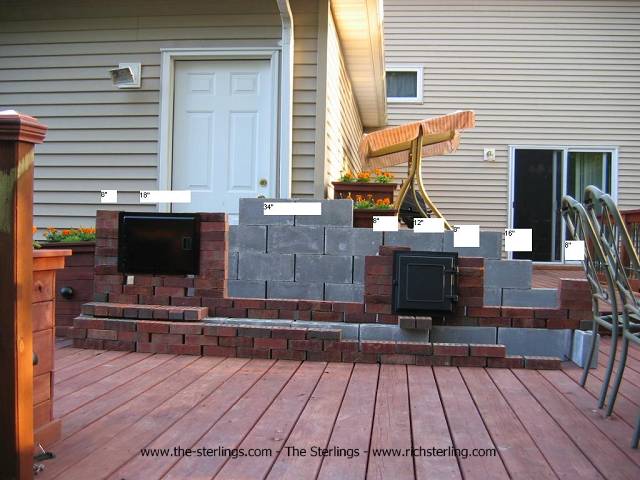
I surfed and surfed and came up with a few good ideas from the Internet. Another decent source of information was a paperback book called Building Barbecues & Outdoor Kitchens by Sunset books. Once I got the basic shape in mind I had to determine the overall space I had to work with. Of course, in my particular situation I had just got a stamped concrete patio poured so I knew exactly what I had to work with. (10 feet).
You must also take into consideration, your surroundings. Going with a design that includes a fireplace as mine does, it does generate some heat. You really don't want it directly under any low trees! You'll need a chimney cover to keep sparks to a minimum and to keep precipitation from entering down your flue. You should also leave plenty of space around the entire perimeter, with of course plenty of space in the front for lounging.
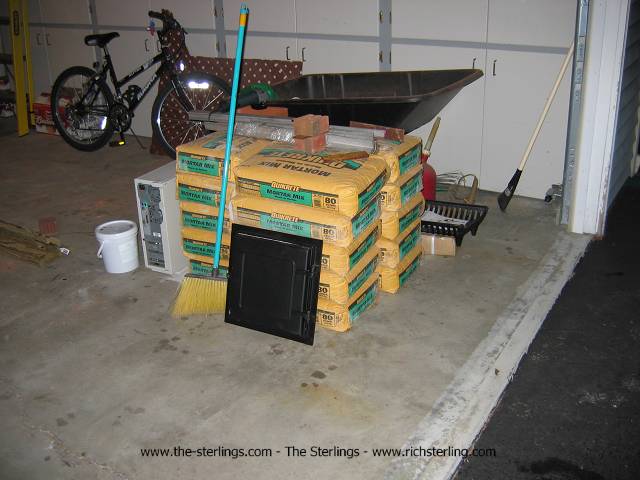
Since mine is on my poured patio I'm confident it can handle the weight. Concrete is cheap, go thick enough! Maybe even go wide enough to include a nice hearth area or an area for sitting, but I recommend at least a couple of feet for sparks, etc. The weight of the truck that dropped off my materials was enough to crush my driveway, no water added. Each one of those yellow bags of mortar you see in the photos are 80 pounds each. You cringe each time you have to open a new bag.
Along with the research I had to do on my initial design, I had NO experience whatsoever in masonry. If you're in the same arena as me, you might want to do a smaller practice project somewhere in your yard BEFORE mixing your first batch of mortar and going to town. If I had to do it all over again, I would have definately practiced first! Although I learned a lot by trial and error, sometimes the knowledge gained was a little too late. It made for a lot of scrubbing and cleaning in the long run
and a lot of mis-aligned or loose brick and block right from the start.
Since this IS a masonry project, I highly recommend consulting with a TRUE Mason BEFORE starting the job. I found that getting several opinions and suggestions from "ALMOST" Masons resulted in too many varying opinions and when it came down to it, in 90 degree heat, neither bickering over which way was best OR undoing/redoing work was NOT what I enjoyed the most about this project, especially with all the pre-planning I thought I had done.
There are several good websites out there which offer great advice for the novice. In addition to your research on barbeques another good resource for methods and ideas are brick pizza and bread ovens. My original design had a small brick oven that was going on the left side. Due to space limitations and time constraints, I had to nix it in the end. Now I really wish I inlcuded it. Time is also another factor you really need to have planned out from the very beginning.
So, you have an idea in mind where do you go from there? Get some graph paper and start with a basic sketch. Next, since I'm an avid computer geek as well I open the Paintbrush program that most everyone has already on their computers and I started pulling in basic images of ideas I liked. I actually saved these files too but have since lost them because I wasn't a [i]good enough[/i] computer geek! (Long story, but Earthlink is no longer my friend!) So now I have a rough draft of what I wanted it to look like and how I wanted it to function. I was ready to start ordering materials...but how many and how much?
Some of the articles on the Internet had actually included the quantity of bricks, blocks and mortar others have used in their projects. This was very helpful and gave a good starting point. Then once I had a rough idea in mind of the quantities I thought I needed, I went to my local brick supplier. The salesman also had a way to calculate the quantity of mortar I would need based on the amount of bricks I was purchasing.
I started with (20) 80 pound bags and purchased an additional (8) bags by the time the job was complete. The other thing I had done to calculate the total number of materials was to simply count the number of bricks in a certain amount of rows, etc. and then multiply by the number of rows I thought I had to go to obtain my total height. Even with all the pre-planning I had done, I ended up making several trips to the brickyard with my own truck for additional brick and block. I beleive the total count of red "backer brick" I used was 1,000. I also used 4x8x16 hollow block for the back and sides which saved me a little. The red backer brick were .42 cents each and the block were .72 cents each. Bags of mortar were somewhere around $7.50 each.
The most difficult part to plan ahead of time was the ceiling. Again, I knew what I wanted to do but I couldn't find any detailed examples to give me an idea ahead of time on how to construct it and tie it in all together. I knew the fundamentals of how to build the ceiling so I went to my local metal scrap yard and I was able to pick up various lengths of extruded aluminum 5/16" thick angle stock. Since it was a friend that owned the scrap yard I couldn't really be choosy about the donation :)
I stopped to my local steel mill who has a scrap pile you can pick through for .50 cents a pound. There, I was to pick up some flat iron stock and some longer angle iron. These are the pieces I used across the top lenghtwise to hold up my chimney flue and my ceiling of firebrick on the inside.
Once I ordered all of my materials from the brickyard, the truck showed up a couple days later and it was all at the top of my driveway waiting for me when I got home, on a Friday no less. I thought I was golden having the whole weekend ahead of me. I had my basic idea all laid out in Microsoft Paintbrush by now, so with printed copy in hand I started dry-stacking everything. I had everything all dry stacked in 2 hours flat. Piece of cake, now all I need to do is mix up some mortar tomorrow and "glue it all together".
Yeah, right. This whole thing took me from May to July!
CONSTRUCTION: Article coming soon. Stay tuned or check out the rest of the photos at http://www.richsterling.com/ !
USE: Article also coming soon... detailed pics as the weather warms up of our spring and summer entertaining.
2/17/2006--Here in Upstate NY, near Albany, we really don't have anything available to us to just stop by and just EAT! About the closest to real BBQ in my area was a local place called "Tex's BBQ" in Albany, NY which is now out of business. Then we have Dinosaur BBQ in Syracuse and NYC. We have a few local caterers that do the local benefit functions, etc. if you don't mind paying about $9.00 for a quarter chicken cooked over charcoal. That just wasn't cutting it for me so I decided to build my own pit.
With spring just around the corner, now is the time I started my research last year (2005) on "How to build a brick BBQ". I knew what I wanted but never working with bricks and mortar before in my life, I was a little nervous going into this project. I'm a computer support technician by day and an avid woodworking hobbyist. In addition to the taste of genuine slow cooked BBQ, I have always enjoyed the pleasant aroma of various woods used during an all day cookout or even a campfire. Just the same, there's nothing like the smell of fresh cut cherry in my shop when I'm working on a woodworking project. I knew I wanted to build something that would be functional as a BBQ/Smoker pit, be an asthetically pleasing focal point in my yard, AND relatively inexpensive. Basically it would have to please me AND my wife.
The following will be a series of articles on Research and Planning, Design and Design-as-you-go construction, and the best part - Using the Pit.
RESEARCH AND PLANNING
I surfed and surfed and came up with a few good ideas from the Internet. Another decent source of information was a paperback book called Building Barbecues & Outdoor Kitchens by Sunset books. Once I got the basic shape in mind I had to determine the overall space I had to work with. Of course, in my particular situation I had just got a stamped concrete patio poured so I knew exactly what I had to work with. (10 feet).
You must also take into consideration, your surroundings. Going with a design that includes a fireplace as mine does, it does generate some heat. You really don't want it directly under any low trees! You'll need a chimney cover to keep sparks to a minimum and to keep precipitation from entering down your flue. You should also leave plenty of space around the entire perimeter, with of course plenty of space in the front for lounging.
Since mine is on my poured patio I'm confident it can handle the weight. Concrete is cheap, go thick enough! Maybe even go wide enough to include a nice hearth area or an area for sitting, but I recommend at least a couple of feet for sparks, etc. The weight of the truck that dropped off my materials was enough to crush my driveway, no water added. Each one of those yellow bags of mortar you see in the photos are 80 pounds each. You cringe each time you have to open a new bag.
Along with the research I had to do on my initial design, I had NO experience whatsoever in masonry. If you're in the same arena as me, you might want to do a smaller practice project somewhere in your yard BEFORE mixing your first batch of mortar and going to town. If I had to do it all over again, I would have definately practiced first! Although I learned a lot by trial and error, sometimes the knowledge gained was a little too late. It made for a lot of scrubbing and cleaning in the long run
and a lot of mis-aligned or loose brick and block right from the start.
Since this IS a masonry project, I highly recommend consulting with a TRUE Mason BEFORE starting the job. I found that getting several opinions and suggestions from "ALMOST" Masons resulted in too many varying opinions and when it came down to it, in 90 degree heat, neither bickering over which way was best OR undoing/redoing work was NOT what I enjoyed the most about this project, especially with all the pre-planning I thought I had done.
There are several good websites out there which offer great advice for the novice. In addition to your research on barbeques another good resource for methods and ideas are brick pizza and bread ovens. My original design had a small brick oven that was going on the left side. Due to space limitations and time constraints, I had to nix it in the end. Now I really wish I inlcuded it. Time is also another factor you really need to have planned out from the very beginning.
So, you have an idea in mind where do you go from there? Get some graph paper and start with a basic sketch. Next, since I'm an avid computer geek as well I open the Paintbrush program that most everyone has already on their computers and I started pulling in basic images of ideas I liked. I actually saved these files too but have since lost them because I wasn't a [i]good enough[/i] computer geek! (Long story, but Earthlink is no longer my friend!) So now I have a rough draft of what I wanted it to look like and how I wanted it to function. I was ready to start ordering materials...but how many and how much?
Some of the articles on the Internet had actually included the quantity of bricks, blocks and mortar others have used in their projects. This was very helpful and gave a good starting point. Then once I had a rough idea in mind of the quantities I thought I needed, I went to my local brick supplier. The salesman also had a way to calculate the quantity of mortar I would need based on the amount of bricks I was purchasing.
I started with (20) 80 pound bags and purchased an additional (8) bags by the time the job was complete. The other thing I had done to calculate the total number of materials was to simply count the number of bricks in a certain amount of rows, etc. and then multiply by the number of rows I thought I had to go to obtain my total height. Even with all the pre-planning I had done, I ended up making several trips to the brickyard with my own truck for additional brick and block. I beleive the total count of red "backer brick" I used was 1,000. I also used 4x8x16 hollow block for the back and sides which saved me a little. The red backer brick were .42 cents each and the block were .72 cents each. Bags of mortar were somewhere around $7.50 each.
The most difficult part to plan ahead of time was the ceiling. Again, I knew what I wanted to do but I couldn't find any detailed examples to give me an idea ahead of time on how to construct it and tie it in all together. I knew the fundamentals of how to build the ceiling so I went to my local metal scrap yard and I was able to pick up various lengths of extruded aluminum 5/16" thick angle stock. Since it was a friend that owned the scrap yard I couldn't really be choosy about the donation :)
I stopped to my local steel mill who has a scrap pile you can pick through for .50 cents a pound. There, I was to pick up some flat iron stock and some longer angle iron. These are the pieces I used across the top lenghtwise to hold up my chimney flue and my ceiling of firebrick on the inside.
Once I ordered all of my materials from the brickyard, the truck showed up a couple days later and it was all at the top of my driveway waiting for me when I got home, on a Friday no less. I thought I was golden having the whole weekend ahead of me. I had my basic idea all laid out in Microsoft Paintbrush by now, so with printed copy in hand I started dry-stacking everything. I had everything all dry stacked in 2 hours flat. Piece of cake, now all I need to do is mix up some mortar tomorrow and "glue it all together".
Yeah, right. This whole thing took me from May to July!
CONSTRUCTION: Article coming soon. Stay tuned or check out the rest of the photos at http://www.richsterling.com/ !
USE: Article also coming soon... detailed pics as the weather warms up of our spring and summer entertaining.
PS: You really will love the BBQ Pizza! It's the best :)
Brick BBQ Pit
***
Want to learn how to make money online?
Click here
Want to BBQ for a Living?

You may want to read this book first.
Slow Smoked Success: Provocative Thoughts on Business, Life and BBQ
"A good piece of BBQ can be judged by many things. But the two most prevalent points are, after you eat a piece you want more. Second point is 2 hours later you should still be tasting it. BBQ does that to you, but so do many other things. This book is written to help appreciate the little things in life by drawing comparisons between good BBQ, Business and Life in general."
Lee Bentch's insightful account of his quest for barbecue offers a fresh perspective and presents barbecue for what it should be...fun.
It would make a good gift for most any barbecue fan.
BBQ Books

Saturday, November 17, 2007
Peoria Custom Cookers
If you like offset cookers, then you need to take a serious look at Peoria Custom Cookers. I've noticed their advertisements in various bbq magazines for a couple of years and tonight I decided to visit their website. One word just about sums it all up....Wow!
They build offsets suitable for catering, back yard smoking, and competition cooking from big to small and just about everything in between.
And if the website doesn't convince you, I'll add this....none other than Bar-b-Quau of the KCBS competition circuit now cooks on a PCC cooker.
They build offsets suitable for catering, back yard smoking, and competition cooking from big to small and just about everything in between.
And if the website doesn't convince you, I'll add this....none other than Bar-b-Quau of the KCBS competition circuit now cooks on a PCC cooker.
Friday, November 16, 2007
How to Carve a Turkey
The folks over at HolidayKitchen.tv sent me a video providing step-by-step instructions for carving a turkey. I'll admit that I usually just slice the turkey any old way I can get it to work, so it's nice to know there are some tips available that provide just the right amount of guidance to make the eating the traditional Thanksgiving turkey just little bit easier this year.
From their website:
1. After roasting, cover the turkey with foil and let it stand for 15 minutes.
2. Transfer the bird to your largest cutting surface.
3. With a sharp, thin-bladed carving knife, find the place where the thighbone meets the body. By cutting between the joints, and not through bones, you can disconnect the bones without much fuss.
4. Pull the thigh away from the bird and slip your knife into the joint to separate the thigh from body.
5. Wiggle the drumstick to locate the joint that separates the drumstick from the thigh. Using the same technique, cut through the joint, not the bone.
6. Next use your knife to find where the wing and body connect. Slip your knife into the joint to separate wing from body on each side.
7. Now remove the breast, by cutting down the center of the bird on one side of the bone and the breast will come off in one piece.
8. Carve the breast into thin slices.
9. Repeat with the other side of the breast.
They also have a DVD available.
We plan to deep fry our turkey again this year after brining overnight in a salt and honey solution. It's become our favorite turkey recipe. I'll take a fried turkey over and oven baked turkey every time.
From their website:
1. After roasting, cover the turkey with foil and let it stand for 15 minutes.
2. Transfer the bird to your largest cutting surface.
3. With a sharp, thin-bladed carving knife, find the place where the thighbone meets the body. By cutting between the joints, and not through bones, you can disconnect the bones without much fuss.
4. Pull the thigh away from the bird and slip your knife into the joint to separate the thigh from body.
5. Wiggle the drumstick to locate the joint that separates the drumstick from the thigh. Using the same technique, cut through the joint, not the bone.
6. Next use your knife to find where the wing and body connect. Slip your knife into the joint to separate wing from body on each side.
7. Now remove the breast, by cutting down the center of the bird on one side of the bone and the breast will come off in one piece.
8. Carve the breast into thin slices.
9. Repeat with the other side of the breast.
They also have a DVD available.
We plan to deep fry our turkey again this year after brining overnight in a salt and honey solution. It's become our favorite turkey recipe. I'll take a fried turkey over and oven baked turkey every time.
Tuesday, November 13, 2007
Barbecue Digest
Here's a few bbq new articles you might be interested in.
Virginia Barbecue
I wrote an article a few weeks ago about Virginia Barbecue and the franchise by the same name. TheStreet.com included an article on this low cost bbq franchise concept today.
Bone Daddy's at the Mill BBQ
This Saginaw, MI restaurant features bbq and live entertainment.
Above Average BBQ
Mackie Hayes, owner, sells bbq from his barbecue chuck wagon. For Mackie, it's a family tradition.
Doc's Q'in Pit Stop
This Modesto, CA restaurant uses almond wood for their bbq.
British BBQ Invasion at Jack Daniels Cookoff
American-style barbecue receives some international recognition.
Virginia Barbecue
I wrote an article a few weeks ago about Virginia Barbecue and the franchise by the same name. TheStreet.com included an article on this low cost bbq franchise concept today.
Bone Daddy's at the Mill BBQ
This Saginaw, MI restaurant features bbq and live entertainment.
Above Average BBQ
Mackie Hayes, owner, sells bbq from his barbecue chuck wagon. For Mackie, it's a family tradition.
Doc's Q'in Pit Stop
This Modesto, CA restaurant uses almond wood for their bbq.
British BBQ Invasion at Jack Daniels Cookoff
American-style barbecue receives some international recognition.
Sunday, November 11, 2007
Akaushi Beef and Akaushi Brisket
Akaushi brisket will set you back $60 for a 14 pounder, or to save on shipping you can buy up to three for $180.
This herd of beef cattle was brought to America in the early 1990's and safeguarded from American bulls for more than 10-years to preserve the Japanese bloodlines.
The largest provider of Akaushi beef in America is Heart Brand Beef, a natural, hormone free beef that is high in monounsaturated fat.
Saturday, November 10, 2007
BBQ Trailer


I like the set-up for this bbq trailer. The cooker is outside with access under the roof at the first window. The kitchen is in the middle section and the serving area is located in the second window at the rear of the trailer.
Subscribe to:
Posts (Atom)